 Troubleshooting")
Three phase AC (Alternating Current Motor) motors are the principal power sources in industrial systems and defects in these machines can quickly result in safety hazards, production losses and equipment damage.
- Electrical Safety
- Basic Test Equipment
- Supply Voltage Condition
- Voltage Unbalance
- Ground Fault in Motor Windings
- Continuity and Winding Condition
- Motor Will Not Start
- Overload Relay Trips (or) Fuses blow during Starting
- Motor Runs below Rated Speed
- Newly Installed Motor does not Start
- Motor runs in Reverse Direction
- Summary
Effective troubleshooting necessitates a systematic method that incorporates safe working procedures, proper testing techniques, logical fault identification and feasible correction procedures.
This post comes with a consistent framework for each issue with details, Causes, Effects, and Solutions.
Electrical Safety
• Always off power and ensure zero voltage before contacting conductors.
• Apply lockout & tagout (LOTO) procedures.
• Never measure live voltage without training in electrical safety.
• Caution of stored energy (spring mechanisms, capacitors & spinning interia)
Basic Test Equipment
| Equipment | Purpose |
| AC Voltmeter | Measure supply voltage and balance. |
| Clamp-on Ammeter | Measure motor current (loaded and no-load). |
| Ohmmeter | Check winding continuity and resistance. |
| Megohmmeter (Megger) | Test insulation resistance to ground. |
Supply Voltage Condition
Industrial motors are designed to operate within ±10% of their rated nameplate voltage.
Causes
• Low voltage is commonly caused by excessive voltage drop in long cables.
• Incorrect voltage is often caused by the wrong transformer tap settings.
• Poor utility supply can also result in undervoltage or overvoltage conditions.
Effects
• Low voltage causes increased current, overheating, and reduced torque.
• High voltage stresses (or) damages insulation and that reducing motor life.
Solutions
• Use a voltmeter to directly measure voltage at the motor terminals.
• Adjust the transformer tap settings to correct the abnormal voltage levels.
• Change the transformer tap settings to fix the anomalous voltage levels.
Voltage Unbalance
Voltage unbalance between phases should never exceed 5% in a healthy three-phase (3 phase) system.
Causes
• Voltage unbalance is caused by blown fuses in one phase.
• Voltage unbalance occurs due to loose (or) corroded terminals.
• Unequal transformer loading can also create unbalanced voltages.
Effects
• Voltage unbalance causes excessive heating in motor windings.
• Voltage unbalance may significantly reduce the motor output capacity.
• Prolonged operation under unbalance shortens insulation life.
Solutions
• Measure all three line-to-line voltages and compare the readings.
• Replace blown fuses and tighten (or) repair defective terminals.
• Correct upstream supply issues that cause unequal phase loading.
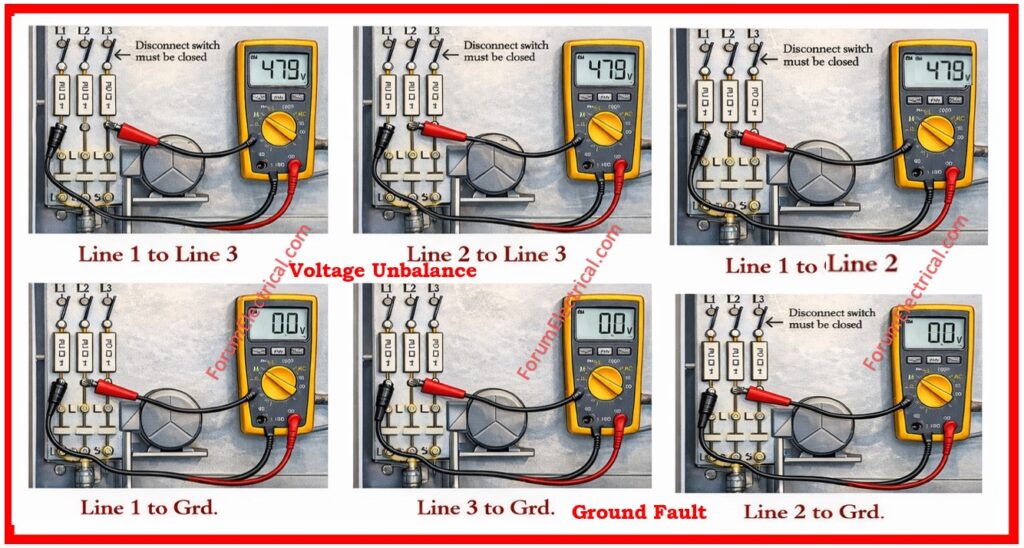
Ground Fault in Motor Windings
Motor windings must remain electrically isolated from earth ground and insulation resistance must be verified using a Megger.
Causes
• Ground faults are caused by moisture entering the motor insulation system.
• Ground faults develop due to dirt, oil contamination and insulation aging.
• Excessive heating can damage the insulation and also create leakage paths to ground.
Effects
• Ground faults can cause frequent fuse blowing and earth fault tripping.
• Ground faults can create unsafe touch voltages & increase fire risk.
Solutions
• Performing insulation resistance (IR test) testing between windings and the motor frame.
• Dry, clean (or) repair the motor if insulation resistance is found to be low.
• Never energize a motor until the acceptable insulation resistance is confirmed.
Continuity and Winding Condition
Continuity testing confirms that internal winding circuits are intact and correctly connected.

Causes
• Open windings occur due to broken conductors (or) thermal damage.
• Shorted turns occur due to insulation breakdown between coils.
• Incorrect lead connections occur due to the wiring errors during installation (or) repair.
Effects
• Winding faults cause the motor to fail to start or draw excessive current.
• Internal winding defects often leads to vibration, noise and overheating.
Solutions
• Measure the resistance between corresponding motor leads and also compare phase values.
• Verify the correct lead connections using the motor wiring diagram.
• Remove the motor from service for repair if the resistance values are significantly remains unbalanced.
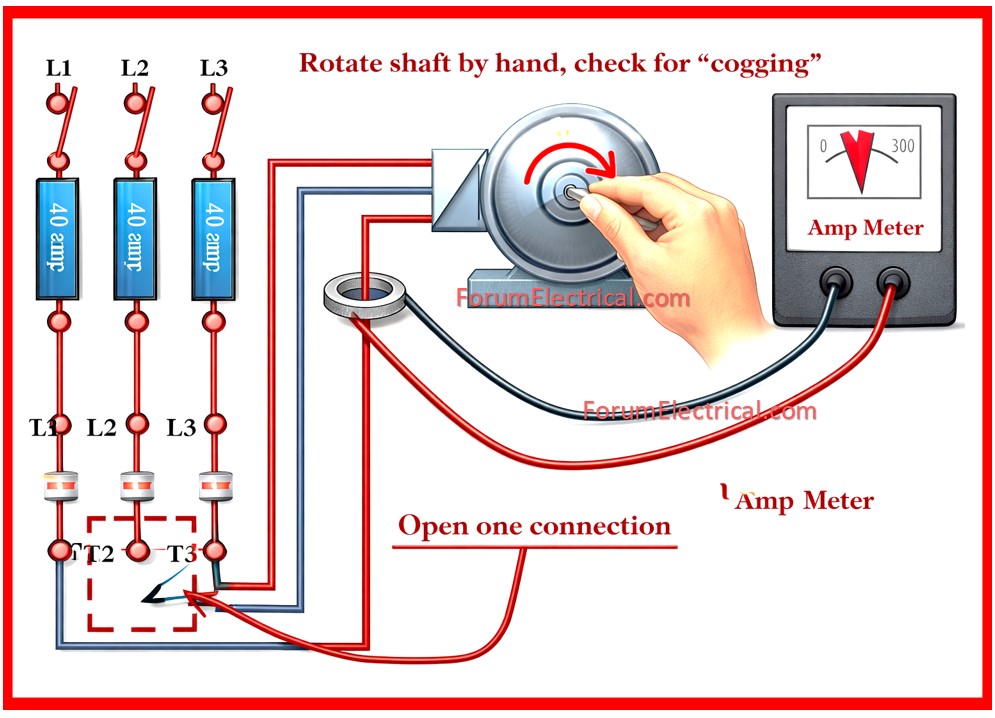
Motor Will Not Start
A motor that does not start usually indicates an electrical supply issue, a control problem (or) a mechanical restriction.
Causes
• The motor fails to start when one phase is missing due to a blown fuse (or) loose connection.
• The motor fails to start when a ground fault exists in the windings.
• The motor may not start if the driven machine is mechanically jammed.
Effects
• The motor produces a humming sound without rotation.
• The protection devices trip immediately after energizing.
Solutions
• Verify the presence of all three phases (3 phases) using a voltmeter.
• Perform insulation resistance testing before re-energizing the motor.
• Rotate the shaft by hand to confirm that the motor & load move freely.
Overload Relay Trips (or) Fuses blow during Starting
Frequent tripping during starting indicates that the motor is drawing excessive current for too long duration.
Causes
• Excessive (more) mechanical load prevents the motor from accelerating normally.
• Bearing problems & tight couplings increase the starting torque requirements.
• Grounded (or) shorted windings increase the starting current abnormally.
Effects
• Protection devices trip repeatedly and used to disrupt the operation.
• Prolonged high current may causes overheating of windings and even cables.
Solutions
• Uncouple the motor from the load and test its no load current.
• Compare no load current with typical values based on their motor speed ratings.
• Repair (or) reduce the mechanical load if current returns to normal when uncoupled.
Motor Runs below Rated Speed
A standard squirrel cage motor should operate close to its rated speed under normal load.
Causes
• Excessive load forces the motor to operate at higher slip and lower speed.
• Slipping belts (or) worn couplings reduce the effective output speed.
• Broken rotor bars reduces the available torque in rare cases.
Effects
• Reduced speed causes loss of production & inefficient operation.
• Overheating occurs if the motor is continuously gets overloaded.
Solutions
• Measure the running current to confirm whether the motor is overloaded.
• Inspect belts, pulleys and couplings for the mechanical defects.
• Refer the motor for the advanced testing if rotor defects are suspected.
Newly Installed Motor does not Start
Newly installed motors that fail to start usually indicate installation (or) commissioning errors.
Causes
• Incorrect wiring at the starter (or) motor terminal box prevents proper energization.
• Wrong supply voltage does not match the motor nameplate rating.
• Incorrect overload relay settings prevent the motor from running.
Effects
• The motor fails immediately upon commissioning.
• Protection mechanisms are employed to trip the motor before it reaches speed.
Solutions
• Verify that the motor nameplate voltage matches the required supply voltage.
• Confirm that the correct lead connections inside the terminal box.
• Check starter, contactor (or) VFD logic and ensure correct protection settings.
Motor runs in Reverse Direction
Three phase (3 phase) motor rotation depends entirely on the phase sequence of the supply.
Causes
• Reverse rotation is caused by incorrect phase sequence at the motor terminals.
Effects
• Pumps, fans and conveyors operate backward and can damage the process or equipment.
Solutions
• Swap any two phases at the starter output (or) motor terminals to correct the direction of rotation.
Summary
Effective motor troubleshooting is based on proper safety practices, accurate measurements and logical fault analysis.
When engineers and technicians consistently apply the structure of general understanding, cause identification, effect evaluation and practical solution which reduce downtime, improve reliability and significantly extend motor service life.
This troubleshooting method transforms troubleshooting from guesswork into professional engineering practice.