 & Unlatch (RESET) instructions. Understand the functioning concept, ladder logic, and advantages of employing a latch circuit for dependable motor control in the industrial automation.)

Objective
- Create a ladder diagram for switching on & off a motor using a latching circuit.
- Connect the circuit to the PLC & test it.
Materials Required
- Start Push Switch,
- Stop Push Switch,
- Small 24V DC Motor,
- Personal computer with ladder programming software
- Responsibility
- PLC Trainer
Concept
It should be noticed that the control circuit is depicted as a ladder diagram. There are two circuits that could be employed. One is a Direct-on-Line (DOL) starter circuit, while the other uses the PLC’s latch and unlatch commands.
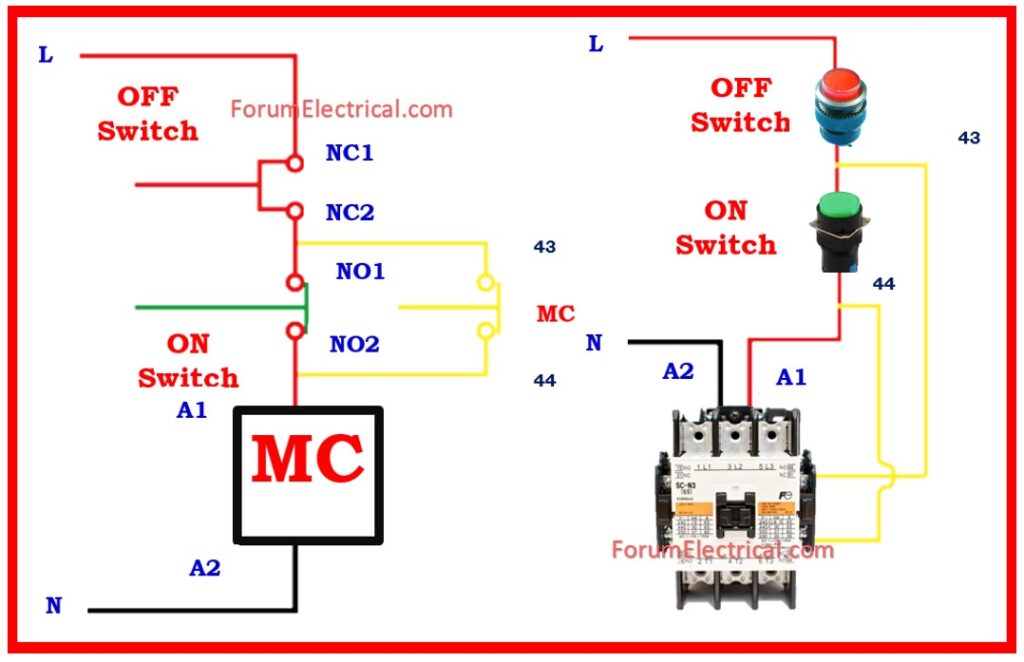
Direct-On-Line Starter (DOL) Circuit
In the DOL Circuit, the Start Switch is linked as NO (Normally Open) & the Stop Switch as NC (Normally Closed). These switches are wired in series with the output coil.
The motor is linked to the power circuit of output coil. When output coil is turned on, the motor will start.
The output coil’s auxiliary NO contact is linked across Start Switch.
When you press the Start Switch, power flows via the output coil.
The auxiliary NO contact is now closed. Because it is linked in parallel to Start Switch, even when we remove the Start Switch, power flows through the output coil’s auxiliary NO contact.
As a result, the motor will be operational (Latching).
When the Stop Switch turns on, the power flow path is terminated since the Stop Switch is open in the logic. Because it is connected in series with coil circuit, no power will flow to it. As a result, the coil is deenergized and the motor comes to a stop.
Procedure:
- Create a ladder diagram of the DOL Starter in computer. Use I:0/0 NO for the Start Switch, I:0/1 NC for the Stop Switch, and O:0/0 for the Output Coil.
- Compile and download the software to the PLC.
- The Start Switch contains two terminals. Connect one terminal to the +24V power supply & another to the PLC’s I:0/0 inputs.
- Connect one terminal of the Stop Switch to the +24V power supply and the other to the I:0/1 input of the PLC.
- Connect +24V to the O:0/0 output’s common pin. Connect the NO terminal of the same PLC output to one terminal of the motor, and another terminal of the motor to the Gnd of 24V power supply in PLC trainer kit.
- Execute the Program.
- Press & release. Start Switch & check for motor operation.
- Press & Release. Check the stop switch to see if the motor is turned off.
Using Latch & Un-latch Instructions
In the Ladder diagram, the instructions Latch (L) & Un-latch (U) are associated with the output coil.
In this control circuit, the Start NO Switch with the Output Coil Latch is utilized instead of merely the output coil.
The next rung (each line in ladder picture is referred to as a rung) contains a Stop NC Switch with an Un-latch Output coil.
- Draw the latch & un-latch ladder diagram. Using I:0/0 NO for the start switch, I:0/1 NO for the stop switch, and O:0/0 for the output coils.
- Compile & download the software to the PLC.
- Connect the switches and motor as in DOL control circuit.
- Run the program & check for correct operation.
| Rung | Input/Output | Instruction |
| 1 | Start PB (NO) → Motor Coil (Latch) | Latch (SET) |
| 2 | Stop PB (NC) → Motor Coil (Unlatch) | Unlatch (RESET) |
Ladder Logic Program for Motor Control
|—-[ Start PB ]—-+—-( Latch Motor )—-|
| | |
| +—-[ Motor Output ]—-|
|—-[ Stop PB ]—-( Unlatch Motor )—-|
If we add motor output
|—-[ Start PB ]—-[ Motor Output ]—-( SET Motor Output )—-|
|—-[ Stop PB ]————————( RESET Motor Output )—|
Advantages of Latch Circuits in Motor Control
- Controls motor operation without constant button pressing.
- Provides dependable control in the industrial automation.
- Prevents unintentional stopping due to a temporary power outage.
This technology is frequently employed in conveyor systems, pumps, fans, & industrial machinery to control motors efficiently.