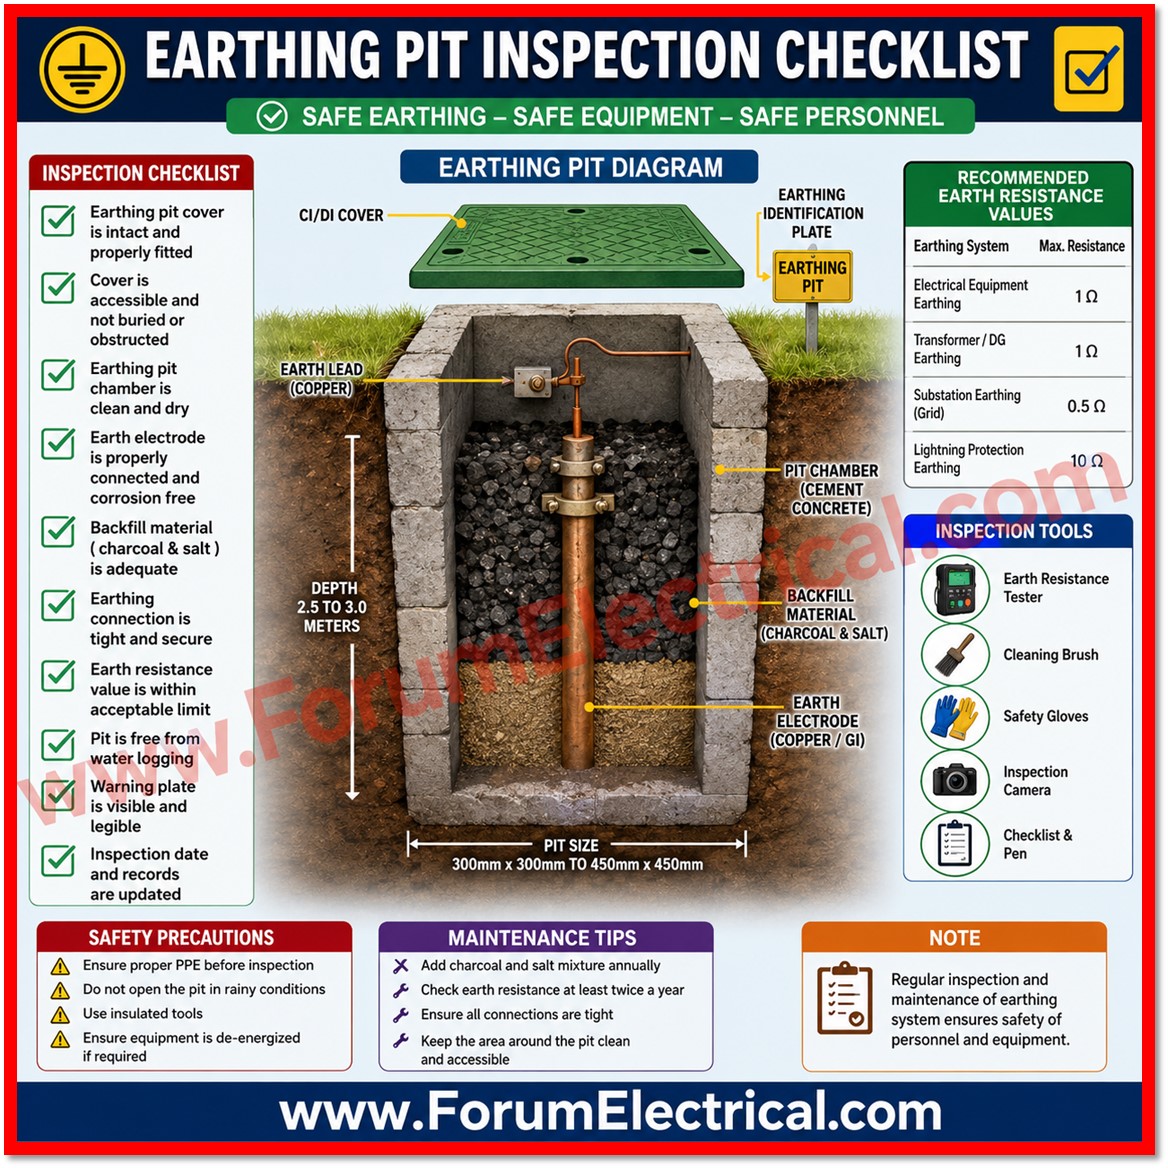
What is Earthing?
Earthing (also referred to as grounding) is one of the most important safety systems in any electrical installation.
- What is Earthing?
- Purpose of an Earthing Pit
- Common Types of Earthing Systems
- Detailed Inspection Checklist
- Key Inspection Checklist
- Location and Installation Depth
- Chamber, Cover and Connections
- Backfilling Material
- Earth Resistance Measurement
- Labeling, Housekeeping and Continuity
- Corrosion, Safety Signage and Records
- Recommended Inspection Frequency
- Checklist
- Conclusion
An earthing pit provides a low resistance path for fault currents, leakage currents, and lightning surges to dissipate safely into the earth, thereby protecting personnel from electric shock and safeguarding equipment from damage.
Regular inspection and testing of earthing pits ensures that the earthing system continues to perform its intended protective function throughout the life of the installation.
This post presents a comprehensive Earthing Pit Inspection Checklist that can be used by site engineers, electrical contractors and quality/safety inspectors during construction, commissioning and periodic maintenance of earthing systems in industrial, commercial, and residential projects.
Purpose of an Earthing Pit
A properly installed and maintained earthing pit serves several essential functions within an electrical installation:
- Ensures personnel safety by limiting touch & step voltages during fault conditions.
- Protects electrical equipment from damage caused by fault currents and transient overvoltages.
- Provides a reliable, low impedance path for lightning & surge currents to flow safely into the ground.
- Stabilizes system voltage with respect to ground improving the reliability of the protective devices.
- Prevents the buildup of static electricity on metallic enclosures & structures.
Because the earthing pit is largely an underground and often overlooked component, systematic inspection is essential to confirm that it continues to function correctly over time particularly as soil conditions, moisture content, and mechanical wear can all affect its performance.
Common Types of Earthing Systems
Earthing pits are constructed using different methods depending on the application, soil resistivity and project specification.
The table below summarizes the common types encountered on site.
| Type | Typical Application | Remarks |
|---|---|---|
| Plate Earthing | Substations, transformers, main distribution boards. | GI or copper plate buried vertically in a pit. |
| Pipe Earthing | Buildings, small installations, DG sets. | Perforated GI pipe driven vertically into the ground. |
| Rod Earthing | Telecom towers, lightning protection systems. | Copper-bonded or GI rod driven to required depth. |
| Chemical Earthing | Areas with high soil resistivity. | Maintenance-free electrode with conductive backfill compound. |
Detailed Inspection Checklist
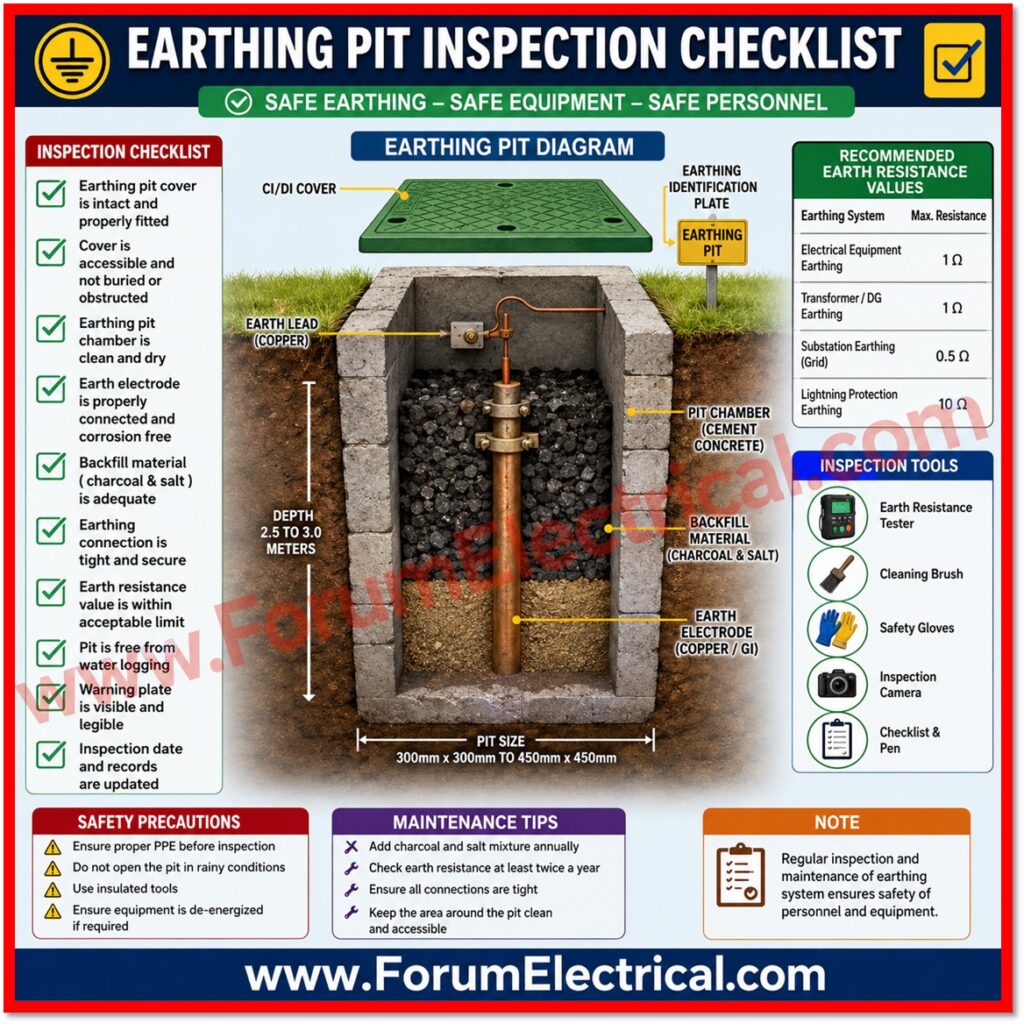
The following 15 point checklist should be completed for every earthing pit during installation inspection, pre-commissioning checks and periodic maintenance audits.
Each checklist should be marked as ‘OK’ (or) ‘NOT OK’, with remarks recorded for any non-conformance so that corrective action can be tracked to closure.
| S.No | Inspection Point | Status (OK/NOT OK) | Remarks |
|---|---|---|---|
| 1). | Verify the earthing pit location as per the approved drawing. | ||
| 2). | Check that the earth electrode is installed at the required depth. | ||
| 3). | Ensure the earth pit chamber & cover are in good condition. | ||
| 4). | Confirm the GI/Copper strip (or) wire is securely connected to the earth electrode. | ||
| 5). | Check all nuts, bolts and clamps are tight and corrosion free. | ||
| 6). | Verify proper welding/brazing of earthing connections where applicable. | ||
| 7). | Ensure backfilling material (charcoal, bentonite (or) earth enhancement compound) is properly filled. | ||
| 8). | Measure & record the earth resistance value using an earth resistance tester. | ||
| 9). | Confirm the earth resistance is within the project specification (typically ≤ 1 Ω / as specified). | ||
| 10). | Check that the earthing pit is labeled/numbered for easy identification. | ||
| 11). | Ensure the inspection chamber is clean & free from water, debris (or) obstructions. | ||
| 12). | Verify the continuity between the earthing pit and connected equipment. | ||
| 13). | Check for signs of rust, damage (or) loose connections. | ||
| 14). | Ensure all safety & warning signs are provided around the earthing pit if required. | ||
| 15). | Record the inspection date, test results and inspector signature for future maintenance. |
Key Inspection Checklist
Location and Installation Depth
The earthing pit location must match the approved drawing to ensure correct spacing from other pits, buildings and underground services.
Installation depth is equally important, as the electrode must reach a soil layer with adequate and consistent moisture content to maintain low resistance throughout the year.
Chamber, Cover and Connections
The pit chamber and cover protect the electrode and connection point from mechanical damage, water ingress and unauthorized access while allowing periodic testing and maintenance.
The GI or copper strip/wire connecting the electrode to the earthing grid must be mechanically secure and provide a low-resistance electrical path; connections should be checked for tightness and freedom from corrosion and any welded (or) brazed joints should be visually inspected for soundness.
Backfilling Material
Backfilling with charcoal, bentonite (or) a specialized earth enhancement compound helps retain moisture around the electrode and reduces soil resistivity, particularly in rocky or sandy soils.
Proper compaction and layering of backfill material directly influences the long-term earth resistance value.
Earth Resistance Measurement
Earth resistance must be measured using a calibrated earth resistance tester (typically employing the fall-of-potential method) and the reading compared against the project specification, commonly ≤ 1 Ω for critical installations such as substations (or) higher permissible values for general purpose earthing depending on applicable standards.
Values exceeding the specified limit indicate the need for additional electrodes, improved backfill (or) soil treatment.
Labeling, Housekeeping and Continuity
Each pit must be clearly labeled or numbered for traceability during future testing and maintenance.
The inspection chamber should be kept clean and free of water or debris that could affect accessibility and readings.
Continuity checks between the earthing pit and connected equipment confirm that the entire earthing network is electrically continuous and free from breaks.
Corrosion, Safety Signage and Records
Visual inspection for rust, physical damage, or loose connections should be carried out at every scheduled maintenance interval since corrosion is a leading cause of increased earth resistance over time.
When required by site safety procedures, warning signage should be installed around exposed pits.
Finally, every inspection must be documented with the date, measured values and the inspectors signature to build a reliable maintenance history for the installation.
Recommended Inspection Frequency
1). During construction: at the time of installation & immediately before backfilling.
2). Pre-commissioning: prior to energization of all the electrical system.
Routine maintenance: at least once every 6 to 12 months (or) as specified by the project/site standard.
3). After major Inspection: Following lightning strikes, heavy fault currents (or) significant construction activity near the pit.
Checklist
Conclusion
A well-designed inspection and testing regime for earthing pits is fundamental to the overall safety and reliability of an electrical installation.
By systematically working through this checklist, engineers and inspectors can identify deterioration or non-conformances early ensuring that the earthing system continues to provide effective protection against fault currents, lightning surges & electric shock hazards throughout the life of the facility.

