
- Why is Circuit Breaker maintenance necessary?
- Circuit Breaker maintenance Checklist
- Circuit Breaker maintenance Schedule
- What is Maintenance Mode on a Breaker?
- What is covered in Circuit Breaker Maintenance?
- Circuit Breaker maintenance Step-By-Step Procedure
- How do you clean a Circuit Breaker?
- Circuit Breaker PPM Activity Safety Guidelines
- Checkpoints for Circuit Breaker Maintenance Activity
- What is the preventive maintenance of MCCB?
- Documentation
Why is Circuit Breaker maintenance necessary?
A circuit breaker is an essential component of a facility’s safety and success. If it fails, an entity can lose a lot of money in the period of time it requires to restore it. The circuit breaker is the component that allows an industrial facility’s electrical system to work.
Most firms would be unable to maintain their building’s electrical system without it. Circuit breakers are very important in industrial electrical systems because they handle high loads and numerous connections.
A circuit breaker, at its core, prevents electrical surges & fires by switching off power if levels grow too high.
Understand that a circuit has to exist throughout the structure and that there must be a continuous path for power to be delivered. When that circuit is severed, no electricity can reach appliances, light fixtures, or machinery.
The breaker can “trip” using electromagnets, vacuum bottles, and other devices, some of which need more maintenance than others.
A facility is at great risk of safety hazards if it does not have a fully functional circuit breaker.
This condition endangers workers and increases the possibility of noncompliance with regulatory agencies. distinct types of breakers possess distinct needs.
Many maintenance activities require the skills and certification of a qualified and licensed professional.
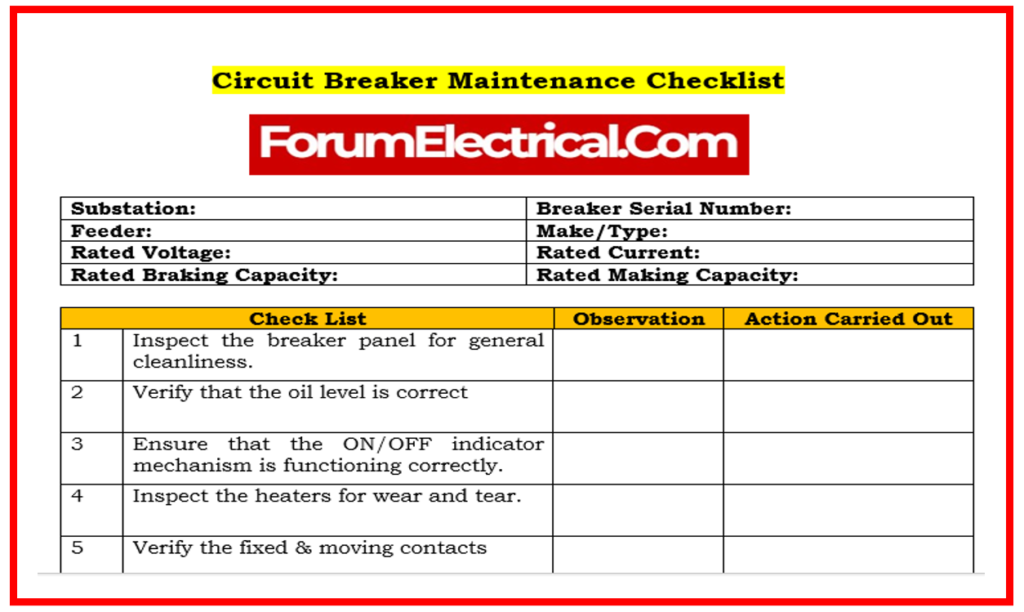
Circuit Breaker maintenance Checklist
A circuit breaker is a pricey electrical device that is used to make and break power supplies as switched On or switched Off. Preventive maintenance is an essential requirement for maintaining the motor starter in excellent working order. Many types of maintenance activities are performed on a monthly, quarterly, half-yearly, and yearly basis.
All of these operations are carried out in accordance with the maintenance checklist, which is a defined step-by-step maintenance process.
Circuit Breaker maintenance Schedule
However, a circuit breaker may not appear to require maintenance from the exterior, it is an important aspect of its performance & longevity. Circuit breaker maintenance is more difficult than replacing a filter or changing oil in other industrial machinery.
Because of the hazards inherent with electricity, a trained expert is frequently required to complete the operation. Circuit breaker maintenance, once accomplished, improves safety & maintains the electrical system running smoothly.
Regular maintenance allows facilities to stay on top of the condition of their equipment & detect any problems as soon as they arise.
IEEE provides a number of standards pertaining to circuit breaker maintenance, including IEEE 1584 for arc flash hazard estimates and IEEE C37 series for high-voltage circuit breakers.
Some of the circumstances that necessitate more frequent maintenance are as follows:
- A dusty, filthy, or caustic environment
- High humidity or a high ambient temperature
- Equipment that is getting old
- Frequently occurring switching (or) fault operations
- Current that has been interrupted or is close to its rated capacity
- Medium-voltage circuit breakers should be serviced annually or every 2,000 operations.
Every six to twelve months, high-voltage circuit breakers must be tested.
What is Maintenance Mode on a Breaker?
Certain circuit breakers come with an immediate trip setting that may be activated during maintenance. This causes quick tripping in the case of faults, minimizing the arc flash incidence energy. This trip is normally set to “OFF” for selective coordination.
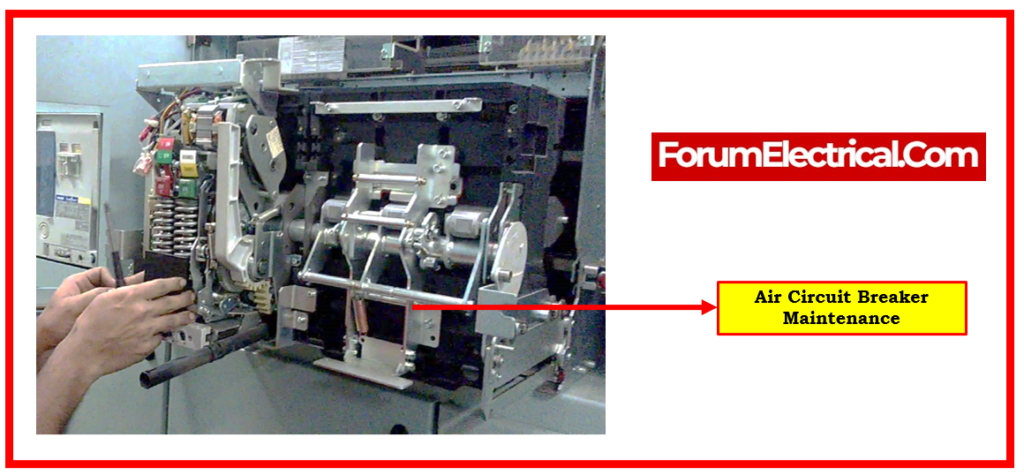
What is covered in Circuit Breaker Maintenance?
A circuit breaker, like any machine, must be cleaned & maintained. Again, maintenance varies from maker to manufacturer, but several near-universal tests and processes can be performed to evaluate and maintain the functioning of most circuit breakers. Before inspecting or repairing anything, the circuit breaker must always be turned off.
Circuit Breaker maintenance Step-By-Step Procedure
Circuit breaker maintenance procedure is included below.
Step-1: Visual and Mechanical Inspection
Step-2: Testing
Step-3: Insulation Resistance
Step-4: Contact Resistance
Step-5: Over-Potential
Step-6: Timing
Step-7: Cleaning
Step-8: Re-Testing, Certification & Test Reports
Step-1: Visual and Mechanical Inspection
A simple visual inspection is an effective way to uncover physical problems such as insufficient lubrication, overheating, or loose connections.
- Inspect the following components:
- Housing and Overall Condition
- Arc Chutes
- Grounding and Anchorage
- All Contacts
Proper operation of any protection devices (or) auxiliary features, including
- Ground-fault trip devices,
- Zone interlocking, or
- Tip and pickup indicator bolts with acceptable torque levels
A visual assessment before contacting the circuit box can uncover problems such as dampness, rust, obvious physical damage, or bugs that could make operation dangerous.
If none of these conditions exist, a technician may open the circuit breaker & inspect it for any loose or dis-colored components.
Overheating causes discoloration on connectors. Other indications of burning, arcing, or heat must be handled.
In addition to simply inspecting the circuit breaker parts & functions, they should be trained on a regular basis.
If the breaker is stiff (or) sticks, it may cause a delay, which increases the chance of an arc flash, which may exceed the ratings of most personal protective equipment.
Step-2: Testing
There are multiple types of tests that can be used to determine the status of a circuit breaker.
A millivolt drop test in an MCCB reveals anomalies such as weak connections or corroded or polluted contacts. It operates at a low DC voltage of 50A-100A.
Overload tripping tests the trip system by passing 300% of the breaker’s rated continuous current through the poles. Tripping timings, which might be influenced by various environmental factors, are less important than the circuit breaker’s capacity to open automatically.
A medium-voltage oil circuit breaker must also be checked for dielectric strength. If it is less than 22kV, the oil needs to be filtered (or) replaced.
A ground-fault trip test evaluates a circuit breaker’s capacity to guard against ground faults on equipment with changeable pickup & delay values. A ground-fault delay function on a breaker determines how much time passes before it trips following a ground fault. Ground-fault delay testing helps confirm that the timing is adequate & within acceptable limits.
Step-3: Insulation Resistance
An insulation resistance (IR) test is a basic test that tests the insulation material’s quality. Its purpose is to impede current flow & keep it maintained within the conductor. Insulation degrades with time, whereas sound insulation can sustain high resistance levels.
An infrared test is temperature sensitive, and values fluctuate greatly depending on the temperature. A technician supplies voltage to the insulation & collects readings after 30 seconds and one minute, depending on the equipment class.
If a winding, such as a motor or transformer, is present, the technician takes another 10-minute reading. They may determine the dielectric absorption ratio using these numbers.
Absorption of dielectrics ratios greater than 1.6 are excellent, whereas those between 1.0 to 1.25 are suspect.
Regarding the polarization index, numbers greater than four are outstanding while values less than one are harmful.
These figures are rather hypothetical, as temperature, humidity, and moisture can all have a significant impact on them. IR readings over time can indicate how insulation is eroding.
Take measurements of those various parameters as well, to know under what conditions each was taken.
Step-4: Contact Resistance
When testing for contact resistance, determining how much the electrical
connections, such as
- Terminations,
- Joints, &
- Busbar sections,
contribute to the overall resistance of a system.
This information can provide information about the condition of a system’s contacts. Contacts that are damaged can create arcing or fires, which can be harmful to an electrical system in general.
Ductor testing is a different term for contact resistance testing, which is done with an Ohmmeter and can employ micro- or milli-ohms. To measure contact resistance, use an Ohmmeter to deliver a constant current across the contacts. The present path’s three stages are measured & compared. Using Ohm’s law, the change in voltage drop can be used to determine the resistance value. If the highest measurement exceeded the lowest by more than 150 %, there is an issue with the circuit breaker. This number should be compared to the one supplied by the manufacturer.
Step-5: Over-Potential
This test is similar to the IR test, although it is more commonly performed on medium- & high-voltage breakers.
It involves passing a high DC voltage across an insulation system, stressing it and exposing moisture, filth, and weak insulation.
The overpotential test is also employed in vacuum breakers, yet a special test set must be utilized or the vacuum bottle would be destroyed.
Examine the manufacturer’s specs to determine the sort of high-potential voltage required. If an arc erupts within the vacuum bottle in the test, X-Ray radiation can happen; therefore, the tester should exercise caution and keep a safe distance.
Step-6: Timing
Timing a circuit breaker provides that it operates in accordance with the manufacturer’s requirements. The procedure differs depending on the type of breaker.
Primary (or) secondary injection test sets are used with low-voltage circuit breakers.
The primary injection approach, which is usually chosen, trips the breaker by forcing current across the entire current route.
Secondary injection directs current to the overcurrent device’s current input terminals. Both are measured using the appropriate characteristic curve for the breaker and overcurrent combination.
Similar testing is performed on medium- & high-voltage circuit breakers, but with different equipment, especially a travel analyzer.
Step-7: Cleaning
We previously stated that circuit breakers must be maintained on a regular basis to ensure proper operation and to prevent corrosion or dirt collection.
Aside from routine maintenance, effective cleaning may prevent these issues by removing rust, dirt, grime, and other foreign elements.
If these substances allow themselves to accumulate in a breaker, they can cause power outages, perhaps resulting in blown fuses, interrupted currents, or fires.
Cleaning out a breaker should only be done by a skilled, experienced expert equipped with the necessary instruments, such as a grounding mat, anti-static wristbands, and non-abrasive cleaning products that will not destroy plating or insulation.
Another concern associated with broken breakers that were accidentally left unattended is lubrication.
Circuit breakers come with adequate lubrication to keep operations moving when they are new, but this may wear away with time. Rust formation or increased friction during system operation might lower torque in particular connections.
Rust can cause the entire system to slow down beyond the manufacturer’s specifications. Maintaining the system’s lubrication increases its safety.
Restoration is one method for keeping a breaker in good working order. A technician will completely disassemble and rebuild a circuit breaker, paint (or) powder-coat it, replate it, and retest it. This system revamp can help it last longer.
Step-8: Re-Testing, Certification & Test Reports
A facility’s circuit breakers should be retested on a regular basis. Each time testing, helps to learn more about their condition. These tests reveal any performance improvements or quality loss brought about by maintenance over time.
Certification is another aspect of quality that may be desirable. Circuit breaker certification gives third-party proof that your breakers are in good working order and can safeguard the facility and its occupants from a variety of electrical risks.
Status of parameters after maintenance:
- After doing maintenance, check parameters to ensure that the equipment is in good working order.
- Input Voltage
- Check the load with respect to the capacity.
- Check the parameters with respect to the default limit.
- Check any unusual sounds.
How do you clean a Circuit Breaker?
Any unclean places can be cleaned by soaking a cotton swab in isopropyl alcohol and wiping hard around the wires & connectors. Unscrew the contact to clean the wires better. Leave the isopropyl alcohol to completely dry before replacing the cover & switching the power back on.
Circuit Breaker PPM Activity Safety Guidelines
- Remove the circuit breaker from the electrical panel.
- On the electrical panel, utilize lock out and tag out (LOTO).
- Make use of insulated tools.
- Wear personal protective equipment such as safety shoes and a helmet.
- Remove tools & tackles once the task is completed.
- After finishing, remove the safety lock & signboard (or) tag.
Checkpoints for Circuit Breaker Maintenance Activity
- Before starting PM action, ensure that there is no power supply.
- In the arch chamber, clean properly fixed & moving contacts.
- Check & clean the contact holding mechanism, such as the spring charging mechanism.
- Check & adjust the breaker protection relay settings for short circuit, earth fault, and overcurrent.
- Examine all releases in operational mode, such as shunt coil, UV, and spring charge.
- Examine the auto and manual functions.
- Examine the ground connection to the panel body.
- Examine any abnormal or unusual sounds produced by the load condition.
What is the preventive maintenance of MCCB?
Fault: Look for arcing (or) overheating (that might indicate breaker faults), bent (or) broken linkages, & weakened insulation.
Cleaning MCCB: To help maintain optimal operation, examine & clean any dust (or) debris from the MCCB’s case on a regular basis.